リンクを入力するだけでアイキャッチや文章を表示させる方法をご紹介いたします。
はじめに
自分の過去に投稿した記事を表示させる場合、純粋にリンクを貼り付けてその記事に飛ばすのが普通でしたが、facebookやツイッターの登場からリンク先の情報をある程度出しておくと言うのが多くなってきていました。
そこで、今回はそういったSNSのように過去の記事をアイキャッチやタイトルなどと一緒に表示させる方法をご紹介させて頂きます。
注意事項
functionファイルをいじるので、必ずバックアップをとっておきましょう。
今回やりたい事
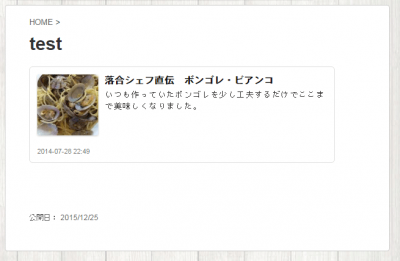
URLを入力するだけでその記事のアイキャッチ画像やタイトル、日付などを取得したい
デザインはfacebookのリンクのように分かりやすい簡単なデザインにしたい
こんな感じです。
では、早速作っていきましょう。
まずはfunctionに情報を追加しよう
//サイトドメインを取得
function get_this_site_domain(){
//ドメイン情報を$results[1]に取得する
preg_match( '/https?:\/\/(.+?)\//i', admin_url(), $results );
return $results[1];
}
//本文抜粋を取得する関数(綺麗な抜粋文を作成するため)
//使用方法:http://nelog.jp/get_the_custom_excerpt
function get_the_custom_excerpt($content, $length) {
$length = ($length ? $length : 70);//デフォルトの長さを指定する
$content = preg_replace('/<img src="data:image/gif;base64,R0lGODlhAQABAIAAAAAAAP///yH5BAEAAAAALAAAAAABAAEAAAIBRAA7" data-wp-more="more" data-wp-more-text="" class="wp-more-tag mce-wp-more" title="続きを読む..." data-mce-resize="false" data-mce-placeholder="1" />.+/is',"",$content); //moreタグ以降削除
$content = strip_shortcodes($content);//ショートコード削除
$content = strip_tags($content);//タグの除去
$content = str_replace(" ","",$content);//特殊文字の削除(今回はスペースのみ)
$content = mb_substr($content,0,$length);//文字列を指定した長さで切り取る
return $content;
}
//本文中のURLをブログカードタグに変更する
function url_to_blog_card($the_content) {
if ( is_singular() ) {//投稿ページもしくは固定ページのとき
//1行にURLのみが期待されている行(URL)を全て$mに取得
$res = preg_match_all('/^(
)?(<a.+?>)?https?:\/\/'.preg_quote(get_this_site_domain()).'\/[-_.!~*\'()a-zA-Z0-9;\/?:\@&=+\$,%#]+(<\/a>)?(<\/p>)?(<br ? \/>)?$/im', $the_content,$m);
//マッチしたURL一つ一つをループしてカードを作成
foreach ($m[0] as $match) {
$url = strip_tags($match);//URL
$id = url_to_postid( $url );//IDを取得(URLから投稿ID変換)
if ( !$id ) continue;//IDを取得できない場合はループを飛ばす
$post = get_post($id);//IDから投稿情報の取得
$title = $post->post_title;//タイトルの取得
$date = mysql2date('Y-m-d H:i', $post->post_date);//投稿日の取得
$excerpt = get_the_custom_excerpt($post->post_content, 90);//抜粋の取得
$thumbnail = get_the_post_thumbnail($id, 'thumb100', array('style' => 'width:100px;height:100px;', 'class' => 'blog-card-thumb-image'));//サムネイルの取得(要100×100のサムネイル設定)
if ( !$thumbnail ) {//サムネイルが存在しない場合
$thumbnail = '<img src="'.get_template_directory_uri().'/images/no-image.gif" style="width:100px;height:100px;" />';
}
//取得した情報からブログカードのHTMLタグを作成
$tag = '
<div class="blog-card">
<div class="blog-card-thumbnail"><a href="'.$url.'" class="blog-card-thumbnail-link">'.$thumbnail.'</a></div>
<div class="blog-card-content">
<div class="blog-card-title"><a href="'.$url.'" class="blog-card-title-link">'.$title.'</a></div>
<div class="blog-card-excerpt">'.$excerpt.'</div>
</div>
<div class="blog-card-footer clear"><span class="blog-card-date">'.$date.'</span></div>
</div>
';
//本文中のURLをブログカードタグで置換
$the_content = preg_replace('{'.preg_quote($match).'}', $tag , $the_content, 1);
}
}
return $the_content;//置換後のコンテンツを返す
}
add_filter('the_content','url_to_blog_card');//本文表示をフック
画像を追加しよう

こちらの画像を「image」フォルダに上げておいて下さい。
これで、アイキャッチ画像などがない場合はこのnoimgが表示されるようになります。
cssで装飾しよう
最後にcssを使って装飾すると完成です。
.blog-card{
padding:12px;
margin:10px 0;
border:1px solid #ddd;
word-wrap:break-word;
max-width:100%;
width:474px;
border-radius:5px;
}
.blog-card-thumbnail{
float:left;
}
.blog-card-content{
margin-left:110px;
line-height:120%;
}
.blog-card-title{
margin-bottom:5px;
}
.blog-card-title a{
font-weight:bold;
text-decoration:none;
color:#111;
}
.blog-card-excerpt{
color:#333;
font-size:90%;
}
.blog-card-footer{
font-size:70%;
color:#777;
margin-top:5px;
}
.clear{
clear:both;
}
実際に比べてみよう
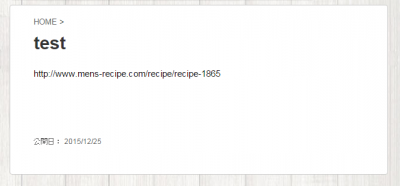
まずはカスタマイズなし
次にカスタマイズあり
このように見た目が全然違ってきます。うん、このカスタマイズは入れてよかったですね。
さいごに
ブログカードって言うみたいですね
今回のfacebook風やツイッター風リンク先の情報を出す方法に関しては色々なブログを参考にさせていただきました。どの記事から取得したのか忘れました・・・すみません。
最近は文章のみよりも画像も一緒に表示させる方が反応が良かったりしました。
やっぱり、リンクだけって時代は終わったのかもしれませんね笑
稼げる副業をしていると、どうしてもこんな事がしたなぁって要望が出てくるのでこなしていくのに必死になってしまいますね。
今回はワードプレスを使っているのでfunctionに情報を追加するだけで簡単に導入ができましたが、他のシステムだといちいち全情報を手作業で取得しなければいけないので面倒すぎるって感じですね笑


